Simple Guide to Face Swap in ComfyUI Using ReActor Node
Amal [1]
For face swapping in ComfyUI, one of the most popular techniques is using the ReActor node. It’s accurate, powerful, and helpful. However, face swapping means impersonating someone else’s identity, so please use it responsibly. Unfortunately, many used it improperly, leading to its removal from the official GitHub repo. It later came back with a SFW checker. That works, but I had issues using it, so I prefer the original version available on Codeberg.
You can find the official guide online, but here’s a simpler version to run it locally.
Simple Guide to Installing ReActor Node in ComfyUI (Precompiled Insightface Method)
What is ReActor Node?
ReActor Node is a tool for face swapping in ComfyUI, a node-based interface for Stable Diffusion. It allows face swaps in images or videos using AI. This guide avoids installing Visual Studio by using a precompiled Insightface package.
Prerequisites
- Windows PC with a decent GPU
- ComfyUI installed (portable version preferred)
- Basic knowledge of files and Command Prompt
- Internet connection
Step-by-Step Installation Guide
Step 1: Set Up ComfyUI
- Download ComfyUI portable version from GitHub
- Extract to a folder like
C:\ComfyUI - Run
run_nvidia_gpu.batto check
Step 2: Install ReActor Node
- Open Command Prompt
- Navigate to:
cd C:\ComfyUI\ComfyUI\custom_nodes - Clone repo:
git clone https://codeberg.org/Gourieff/comfyui-reactor-node - Go into the folder:
cd comfyui-reactor-node
Step 3: Install Precompiled Insightface
- Check Python version:
C:\ComfyUI\python_embeded\python.exe -V - Download matching
.whlfile for Insightface: - Update pip:
python_embeded\python.exe -m pip install -U pip - Install Insightface with:
(adjust the filename based on your Python version)python_embeded\python.exe -m pip install insightface-0.7.3-cp310-cp310-win_amd64.whl
Step 4: Install ReActor Dependencies
Run the script: python.exe install.py from the comfyui-reactor-node folder.
Step 5: Download Required Models
-
Face restoration models: Download to
C:\ComfyUI\ComfyUI\models\facerestore_models- You can find models like GFPGAN, CodeFormer, etc. from Gourieff ReActor face restoration models
-
Face detection and landmark models: Download to
C:\ComfyUI\ComfyUI\models\ultralytics\bbox- Download face_yolov8m.pt (improved face detection model)
- Download 2d106det.onnx
- Download genderage.onnx (gender detection model)
- SAM models (optional for better face segmentation): Download to
C:\ComfyUI\ComfyUI\models\sams- Download sam_vit_l_0b3195.pth (main SAM model)
- Additional SAM models are available at Gourieff ReActor SAM models
Step 6: Verify Installation
- Run
run_nvidia_gpu.bat - Open browser:
http://localhost:8188 - Check if “ReActor Node is running” appears
- Search for ReActor nodes in ComfyUI
Basic Usage Guide
Step 1: Create Workflow
- Add ReActorFaceSwap node (found in the “ReActor” category in the node menu)
- Add two Load Image nodes (target and source)
- Add Preview Image node
- Connect nodes as needed
Basic ReActor Workflow Example:
Basic ReActor Face Swap Workflow
Step 2: Configure
- Choose face restoration model (e.g., GFPGANv1.4)
- Set face indexes if multiple faces
- Optional: gender detection
ReActor Configuration Example:
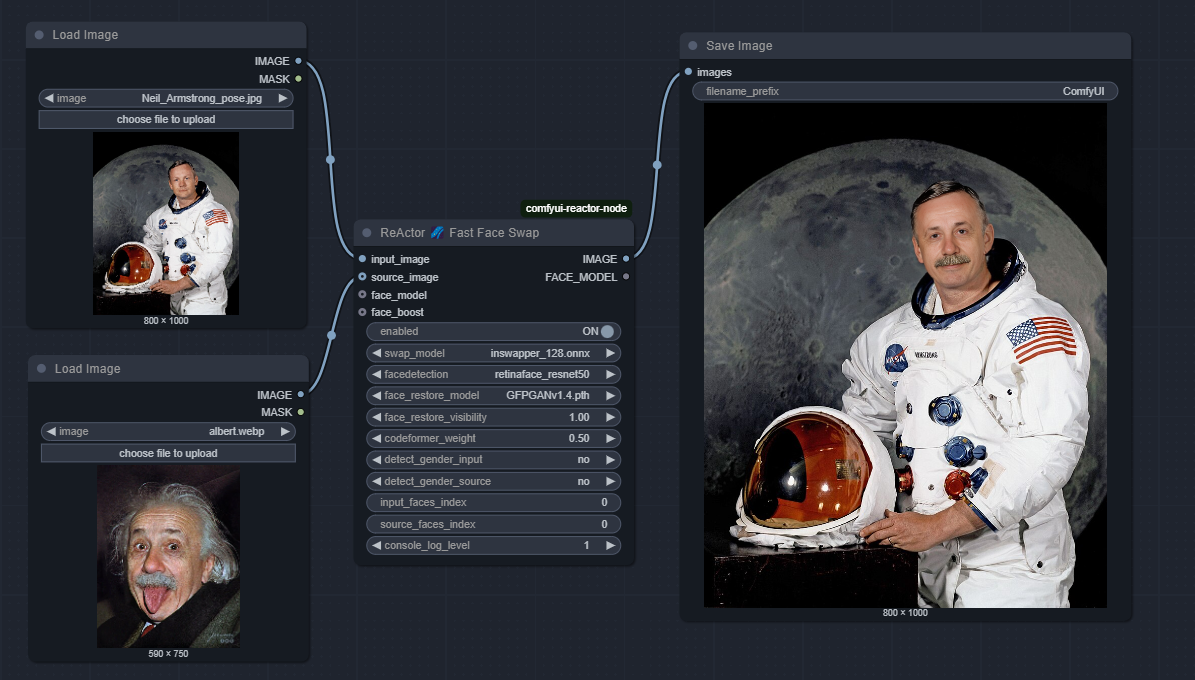
Step 3: Run
Click Queue Prompt and view result in the Preview node.
Workflow:

Troubleshooting
If you encounter these common issues:
-
“AttributeError: ‘NoneType’ object has no attribute ‘get’”: This error may occur if there’s something wrong with the model file
inswapper_128.onnx. -
“reactor.execute() got an unexpected keyword argument ‘reference_image’”: This happens when you’re using an older workflow with a newer version of ReActor. Create a new workflow or update your existing workflow to match the current version.
Additional Information
For more detailed instructions and advanced options, refer to the official ReActor Node repository.